Configuring Okta for Rhythms: A Guide to SSO Integration
Last updated: February 2, 2026
Introduction
This detailed guide provides the provider-specific instructions for configuring Okta as your Identity Provider (IdP) for Rhythms. Single Sign-On (SSO) enables your team to log in securely using their corporate credentials, enhancing security and simplifying access across your organization.
The SSO setup in Rhythms is powered by WorkOS. This document will walk you through the specific steps to create and configure a SAML 2.0 application in your Okta dashboard and connect it back to Rhythms to complete the integration.
Prerequisites
Before you begin, ensure you have the following permissions and access:
For the Rhythms Administrator:
You must be a Rhythms Administrator to access the admin interface and initiate the SSO setup.
For the Okta Administrator:
You must have administrator access to your organization's Okta dashboard.
Permissions to create and manage applications in Okta are required.
If you are not the Okta Administrator, you must share the setup information from Rhythms with the person who is, such as a member of your IT team.
Setup Steps
Follow these steps to configure Okta SSO for Rhythms.
Step 1: Initiate SSO Setup in Rhythms
Log in to Rhythms with your admin credentials.
Navigate to the Settings menu, and then select the Security tab.
Under the Single Sign-On (SSO) section, click the Setup button to begin the configuration process.
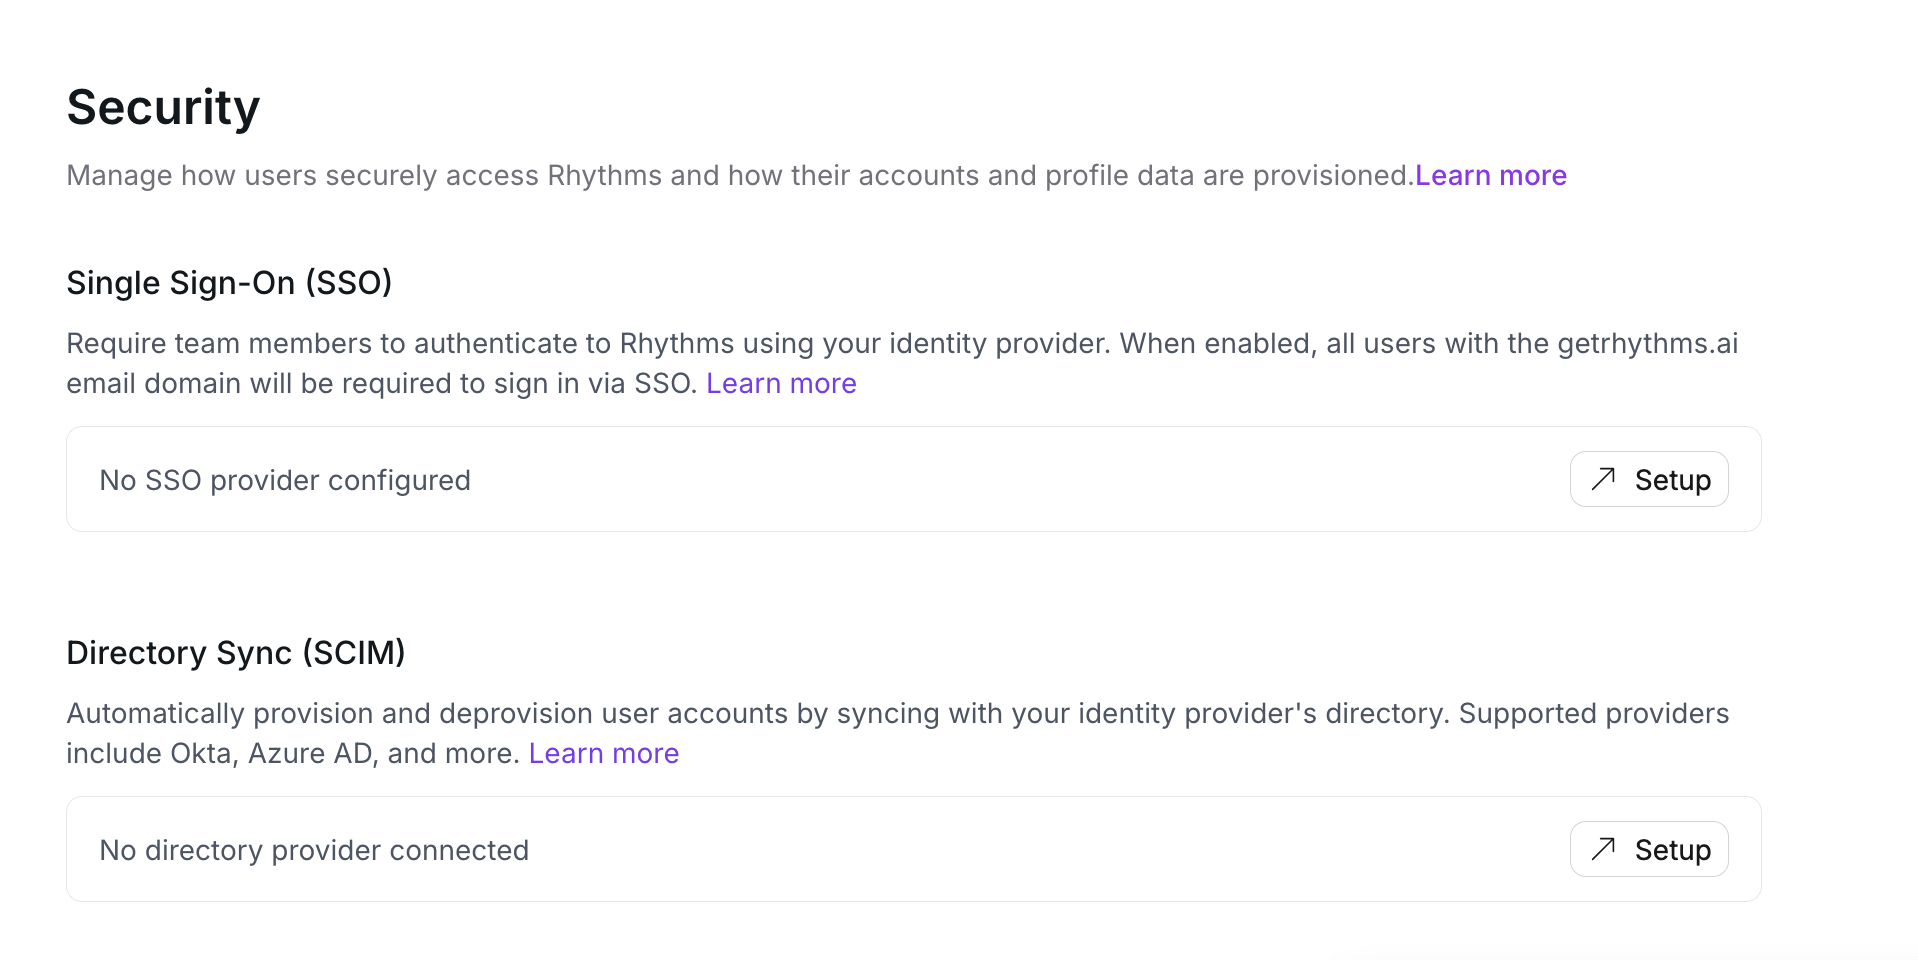
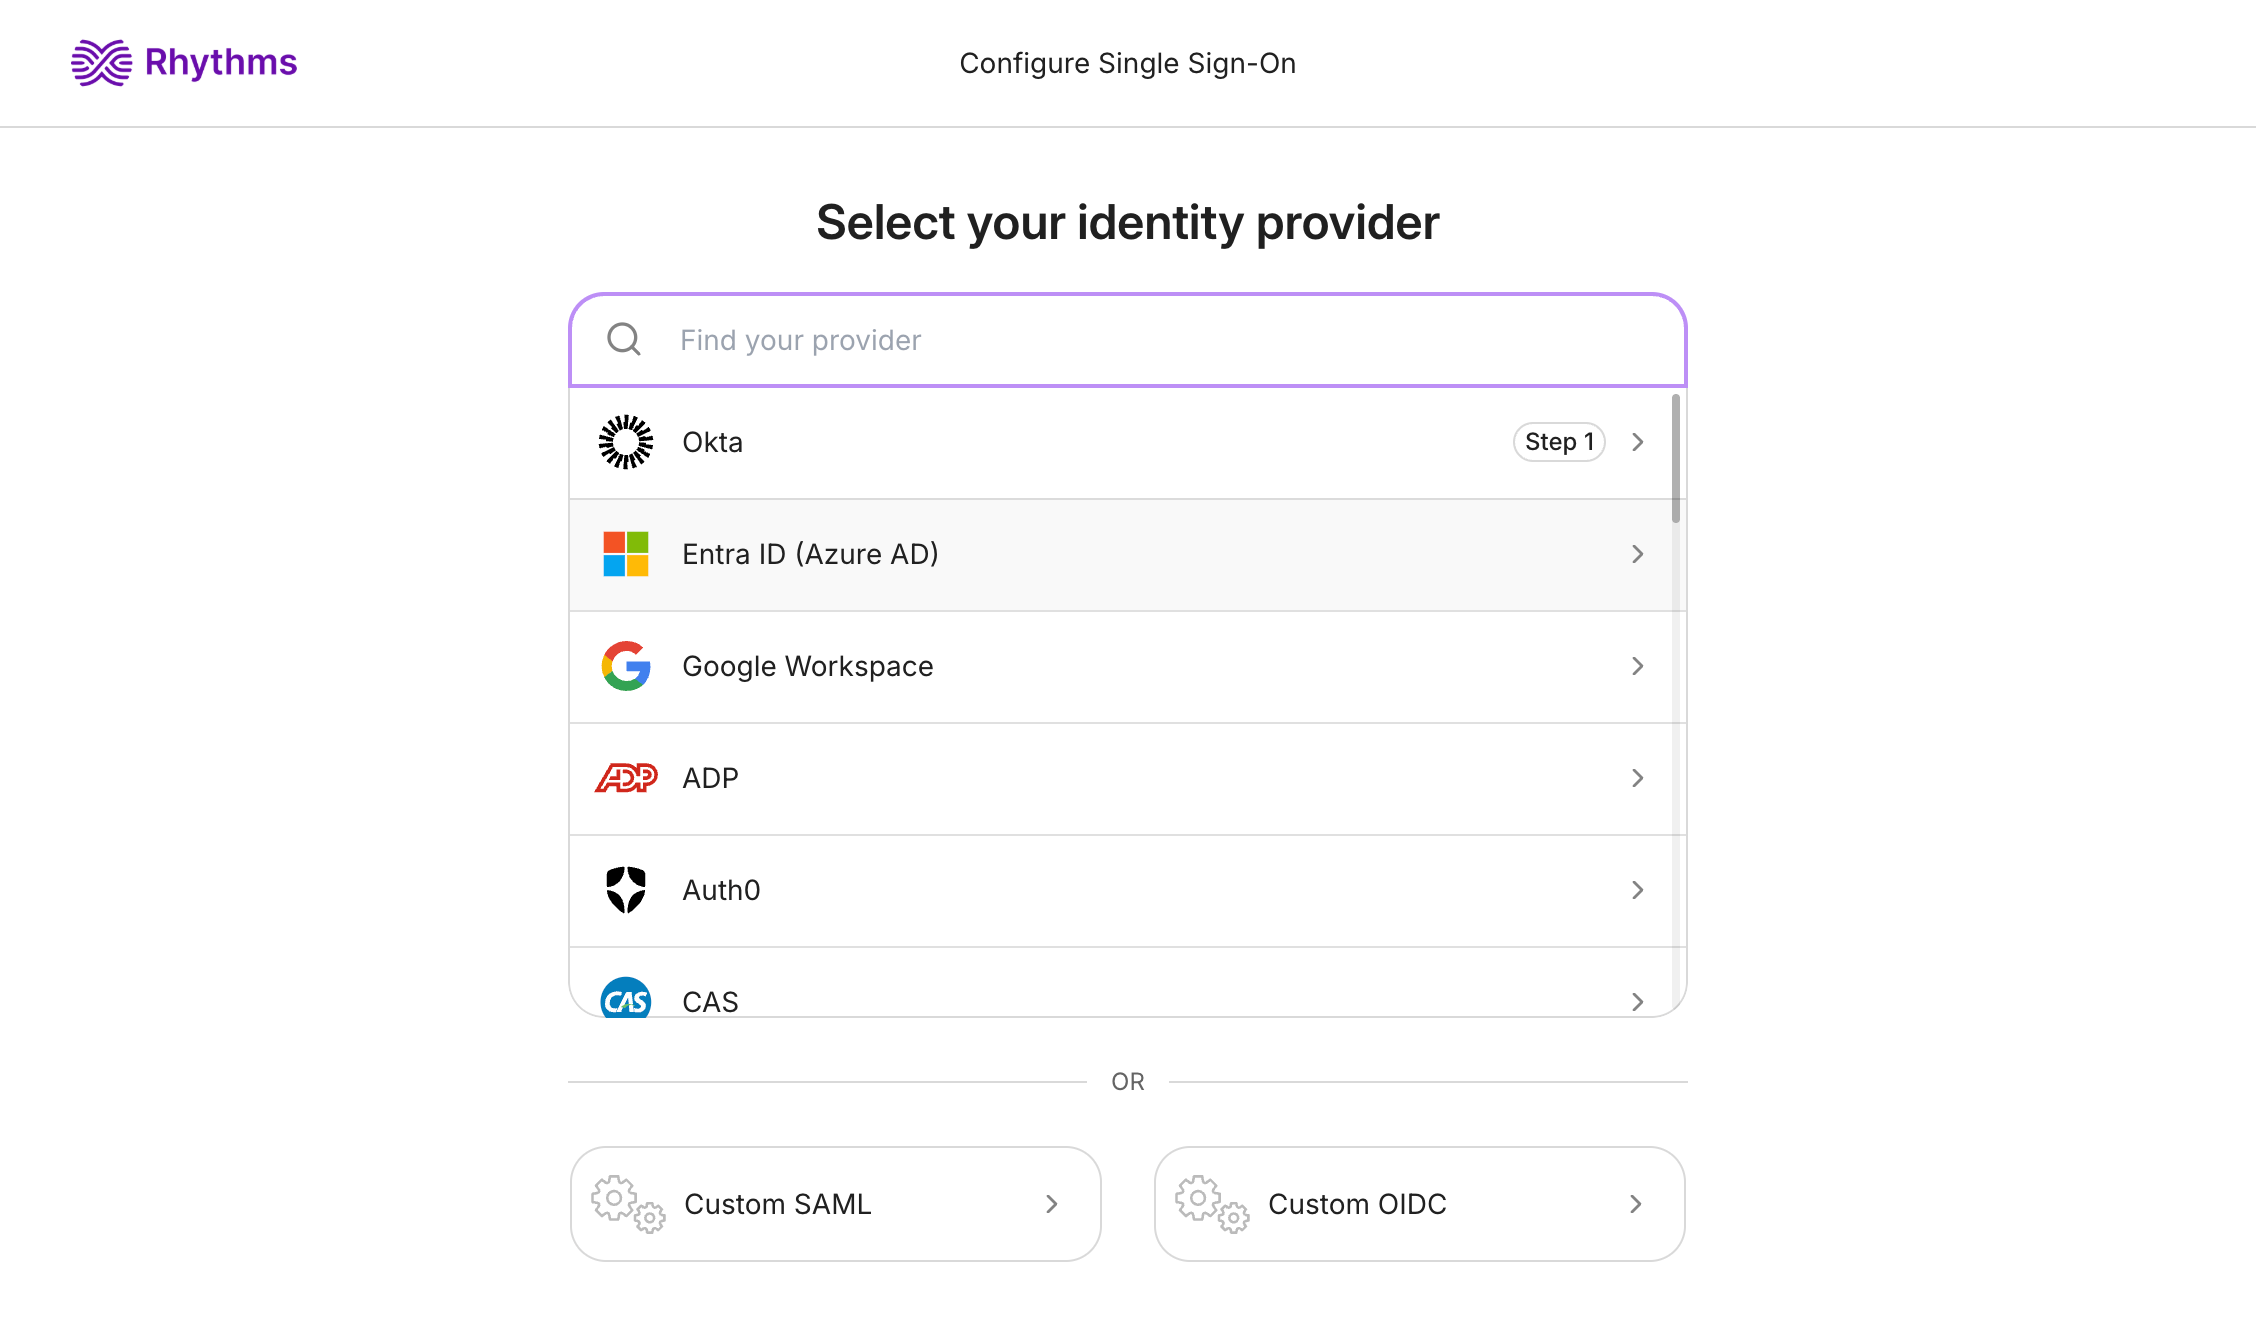
From the list of identity providers, select Okta.
Step 2: Create the SAML App Integration in Okta
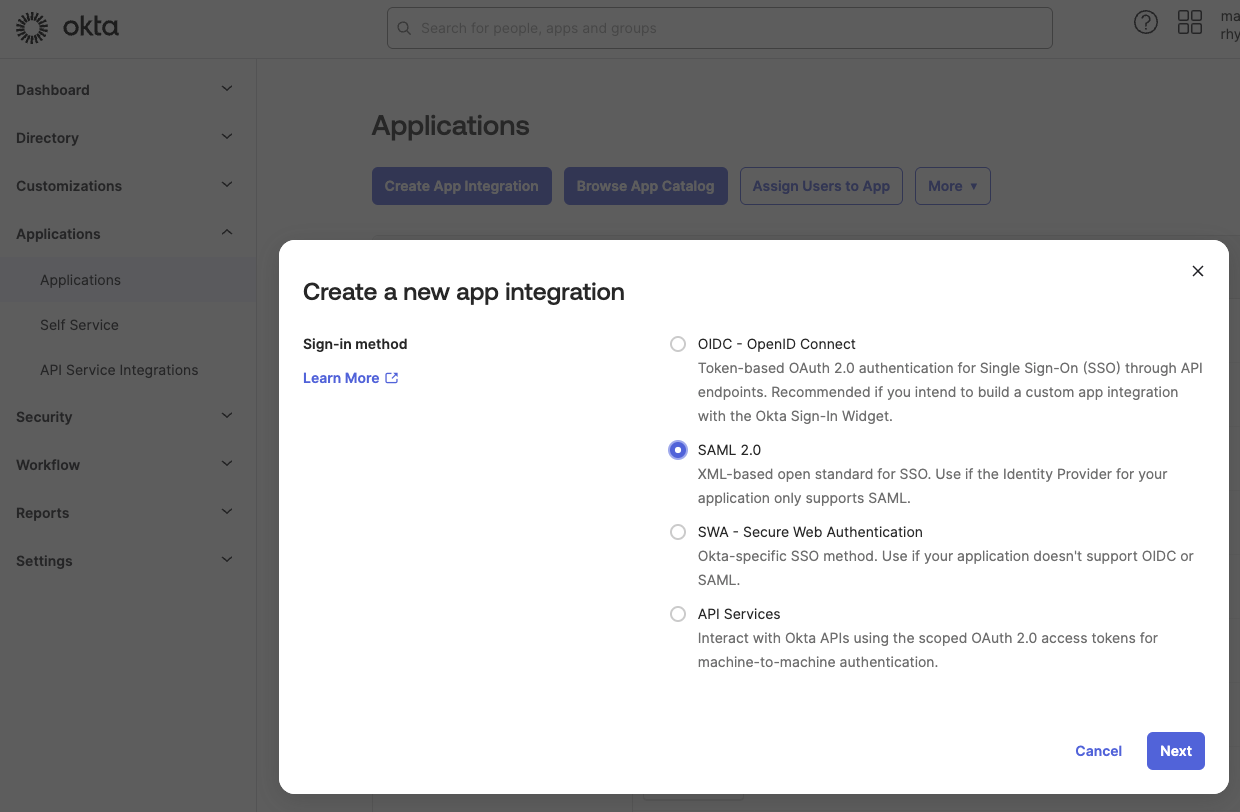
Sign in to your Okta admin console, navigate to the Applications section, and select the Applications tab.
Click Create App Integration.
Select SAML 2.0 as the sign-in method and click Next.
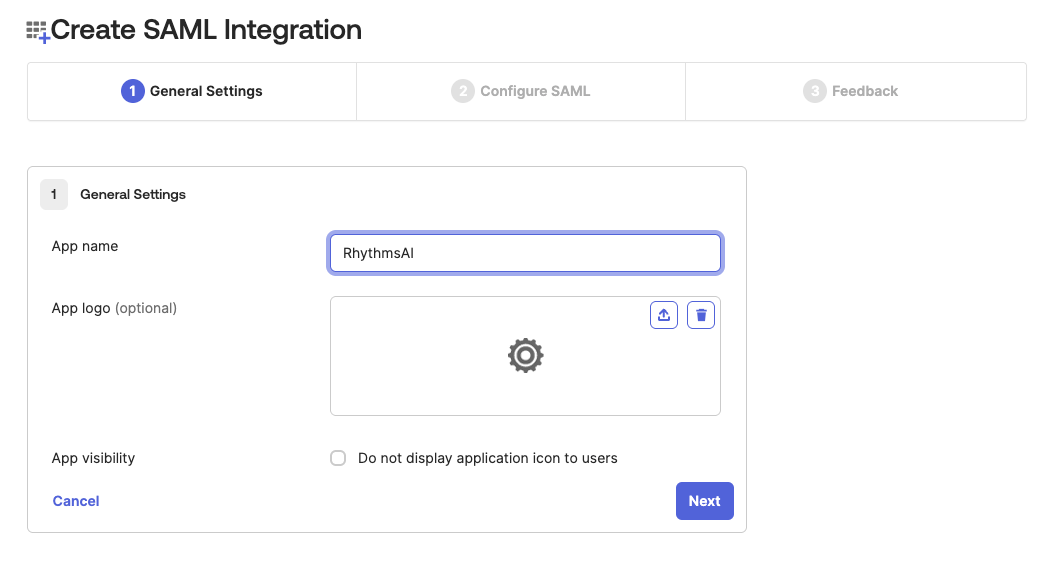
Give your application a descriptive name (e.g., "RhythmsAI") and click Next.
Step 3: Configure SAML Settings
You will now use the information provided by Rhythms (via WorkOS) to configure the SAML connection in Okta.
From the Rhythms SSO setup screen powered by WorkOS, you will find the Single Sign-On URL and the SP Entity ID. The example below is an illustration. Please copy actual values from the SSO setup wizard in RhythmsAI.
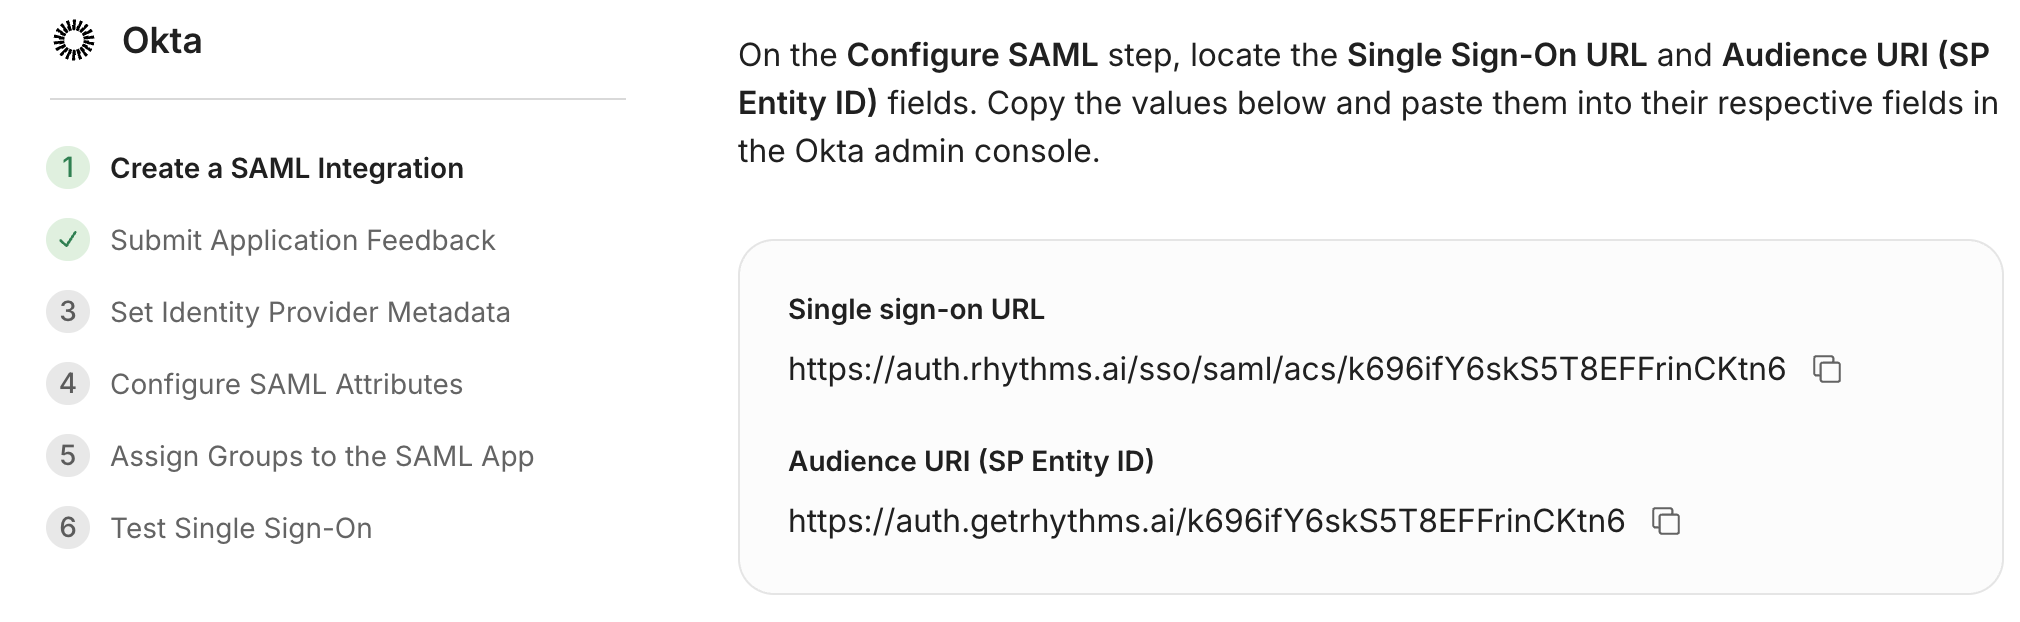
In the Okta "Configure SAML" screen, paste the Single Sign-On URL into the Single sign-on URL field.
Paste the SP Entity ID into the Audience URI (SP Entity ID) field.
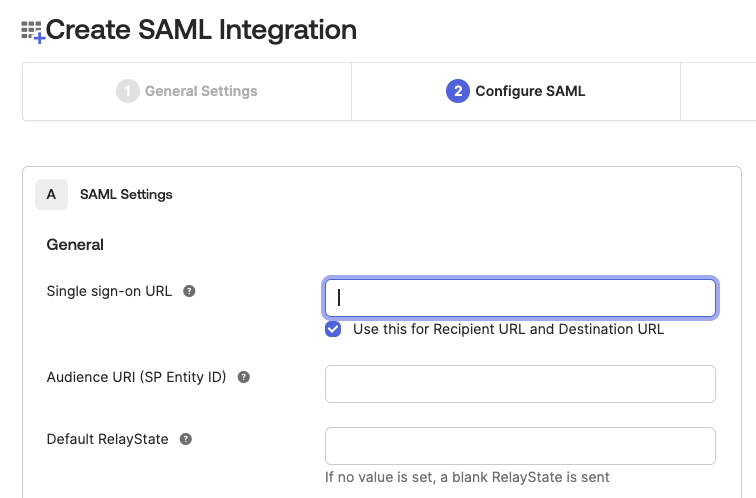
Scroll down to the bottom of the page, then click Next.
Step 4: Submit Application Feedback
On the Feedback step, check the This is an internal app that we have created option. Click Finish.

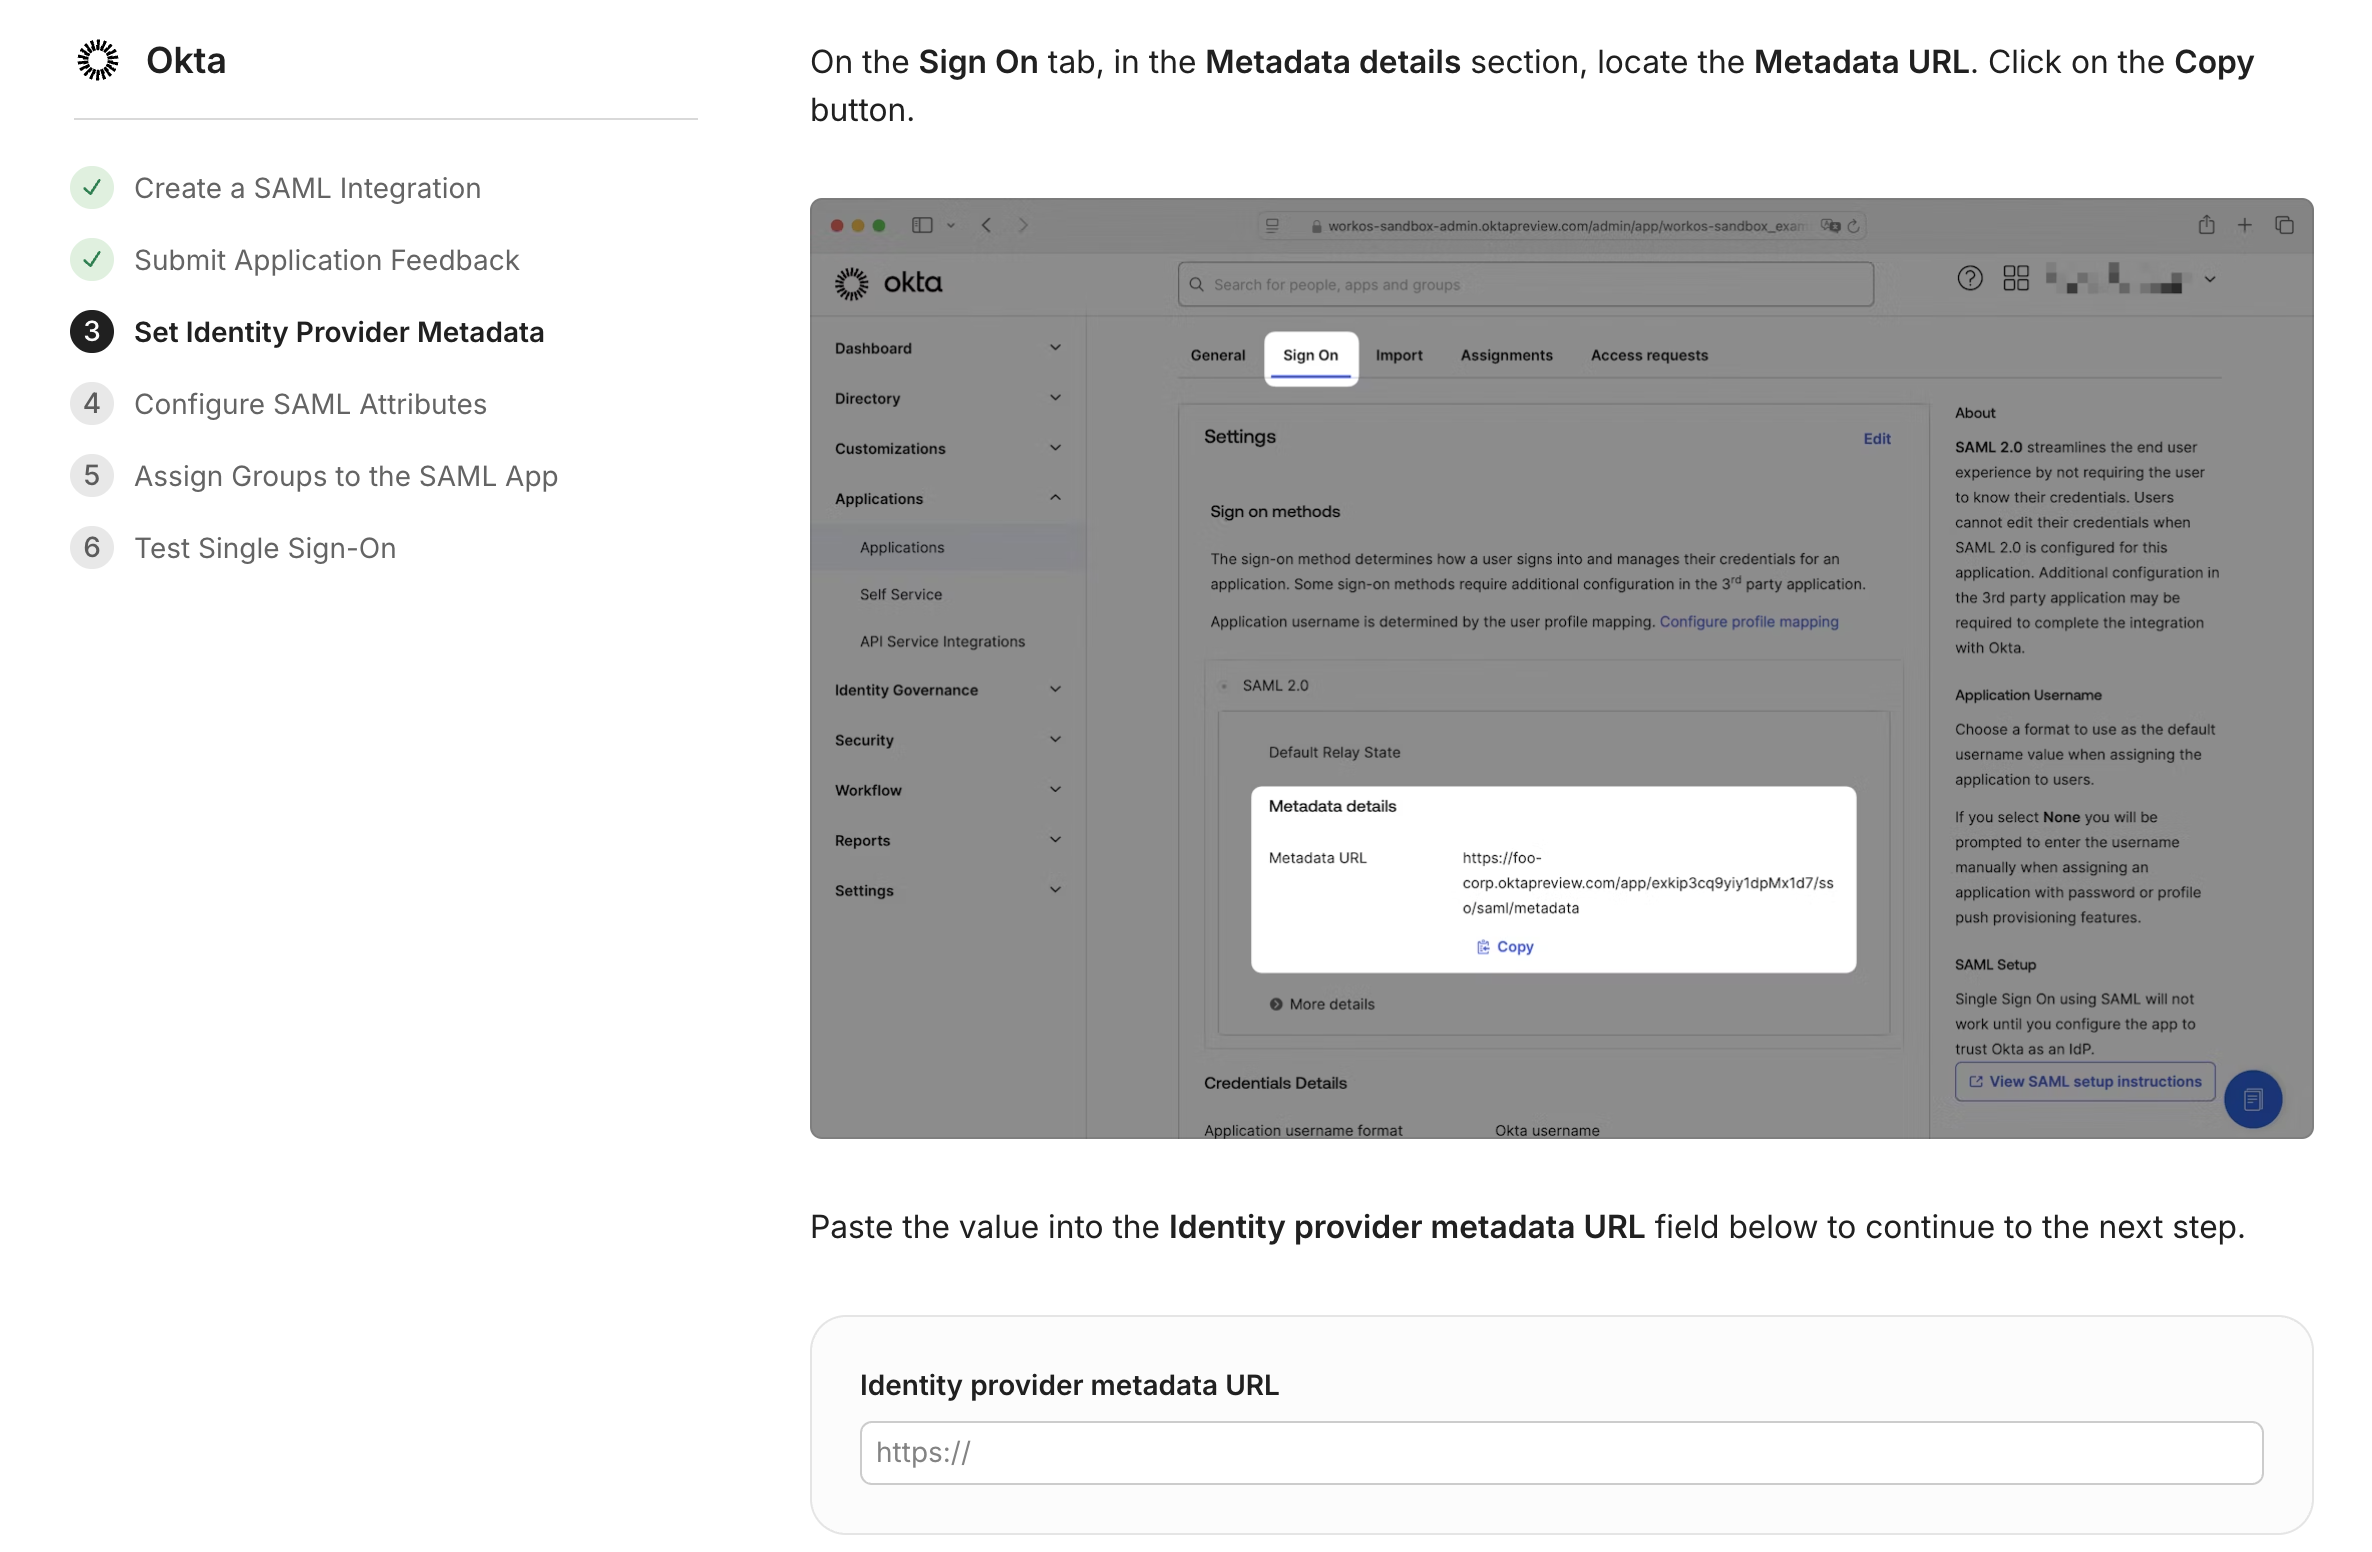
Step 5: Set Identity Provider Metadata
On the Sign On tab, in the Metadata details section, locate the Metadata URL. Click on the Copy button.
Paste the value into the Identity provider metadata URL field into the "Identity provider metadata URL" field that is presented as part of step 3 "Set Identity Provider Metadata" RhythmsAI SSO setup.
Step 6: Configure SAML Attributes: Attribute Statements
Depending on which features have been enabled on your Okta instance, SAML attribute configuration can be located in different areas of the Okta admin console.
Select the General tab. Locate the SAML Settings section. Click Edit.
Scroll down to the Attribute Statements (Optional) section. Add the attribute statements listed below. The name format can be left unspecified.
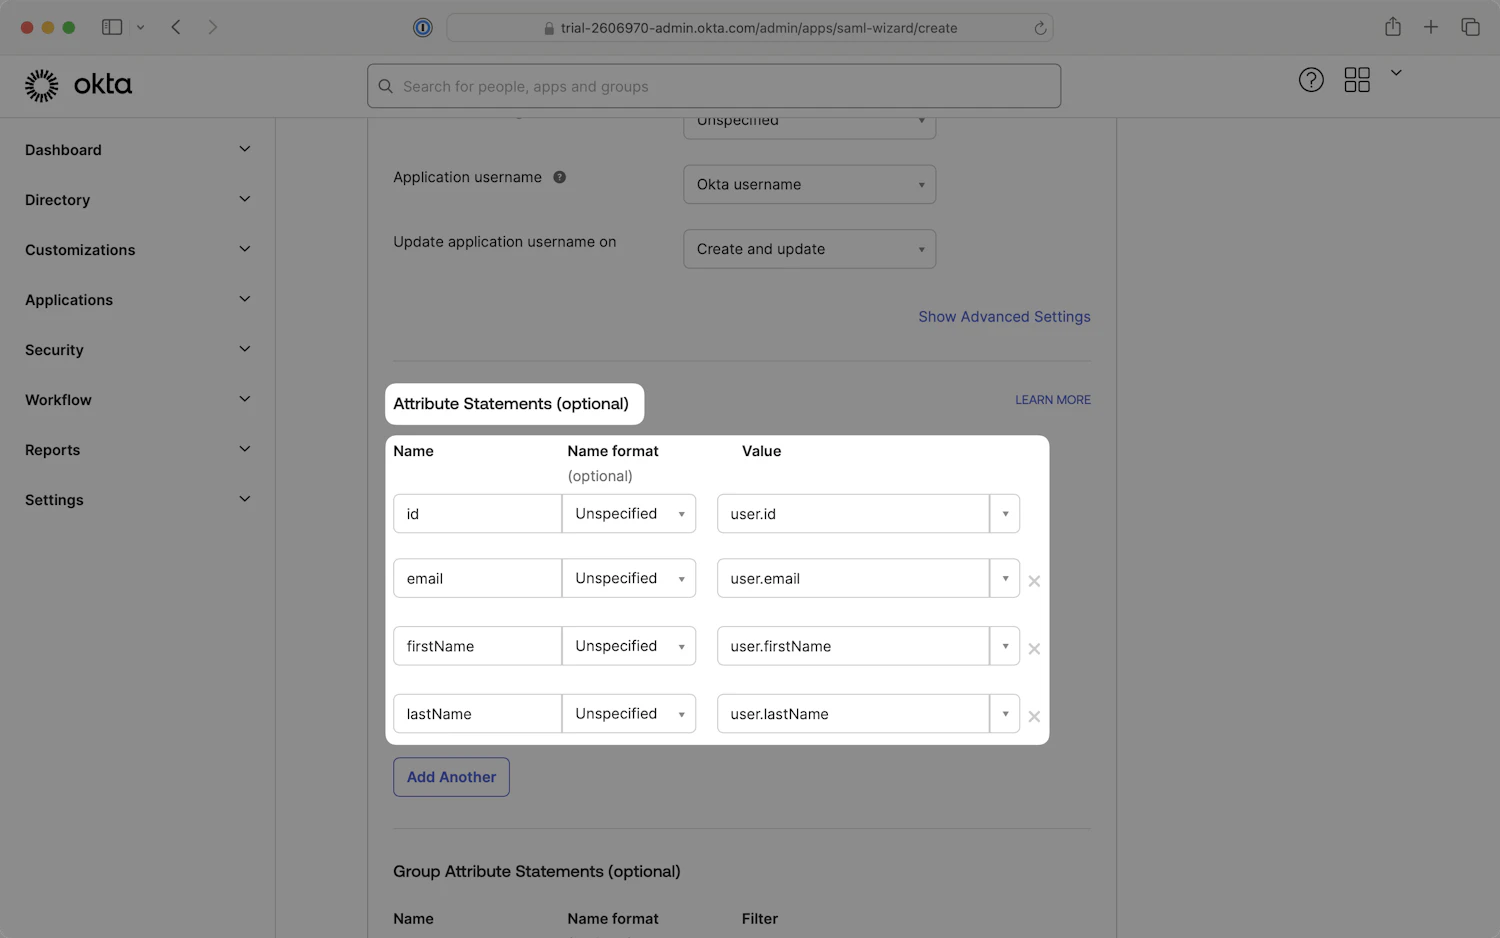
Click Next. On the final step of the wizard, click Finish.
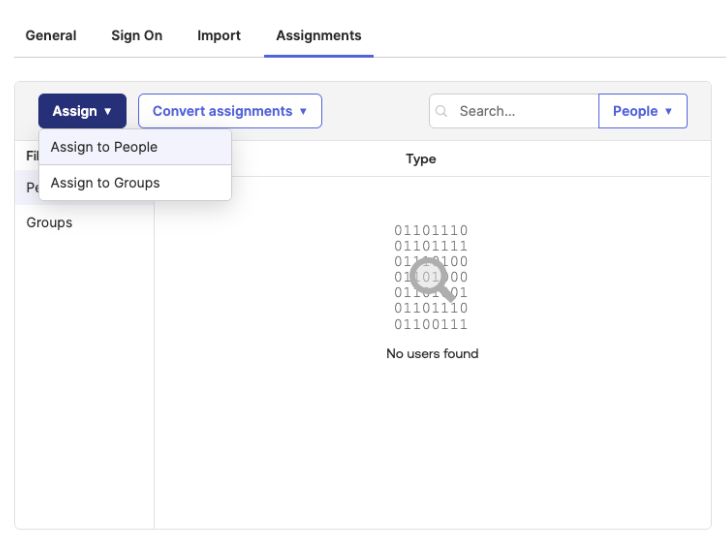
Step 7: Assign People and Groups in Okta
In your new Okta application, select the Assignments tab.
Click the Assign dropdown and choose either Assign to People or Assign to Groups.
Select the users and/or groups that need access to Rhythms and complete the assignment process.
Step 8: Test Single Sign-On
After configuration, you must verify that SSO is working correctly:
Log out of your current session in Rhythms.
Attempt to log in again using your corporate email address.
You should be redirected to your Okta IdP's login page for authentication.
Upon successful authentication, you will be seamlessly logged into Rhythms.
User Experience with SSO
Once SSO is active, the user experience will be as follows:
Login Process: Users will go to the Rhythms login page, enter their corporate email, and be redirected to the Okta login page to authenticate. After authenticating, they will land on the Rhythms dashboard.
Session Management: Active SSO sessions allow for instant access. Sessions expire after 24 hours of inactivity, at which point users will need to log in again.
Best Practices for Okta SSO Setup
Enable MFA for Added Protection: Configure multi-factor authentication (MFA) in your Okta IdP to add an extra layer of security.
Prepare Users for the Transition: Notify your team in advance about the switch to SSO, explaining the new login process and that they may be logged out during the transition.
Test with a Pilot Group: Roll out the SSO setup to a small group of users first to check for any issues before a full company-wide launch.
Monitor IdP Logs: Regularly check your Okta IdP's logs for any authentication failures or errors to quickly troubleshoot and resolve issues.
Troubleshooting Common Okta SSO Issues
Authentication Errors:
Double-check that the ACS URL and SP Entity ID are copied correctly from Rhythms into the Okta SAML settings.
Confirm the user is properly assigned to the Rhythms application in Okta's Assignments tab.
Attribute Mapping Not Working:
Verify the exact spelling and format of
id,email,firstName, andlastNamein the Attribute Statements section of the Okta application.Ensure the Okta user profiles for your test users contain data for all mapped attributes.
Frequently Asked Questions (FAQ)
Q: What information do I need from Rhythms to start the Okta SAML configuration? A: To configure Okta, you will need two values that Rhythms provides during the setup process: the Assertion Consumer Service (ACS) URL and the SP Entity ID (also called Audience URI). Step 3 of this guide shows where to find them.
Q: What attribute statements are required for the SAML assertion?
A: Rhythms requires four attributes to be sent in the SAML assertion. These are detailed in Step 6. They are id, email, firstName, and lastName.
Q: Where do I get the Metadata URL to finalize the setup in Rhythms?
A: The IdP Metadata URL is generated by your Okta application after you have configured it. Step 6 of this guide explains how to find this URL in your Okta application's "Sign On" settings and paste it back into Rhythms to complete the connection.
Q: Does Rhythms support SCIM provisioning with Okta?
A: Yes, Rhythms supports SCIM, however, it requires a separate setup process from SSO. Please refer to our specific "Configuring SCIM with Okta for Rhythms" documentation for those instructions.
Q: What happens if I'm not the Okta Administrator for my company?
A: You must share the IdP admin details with Rhythms, and Rhythms will send the setup URL directly to your IdP Administrator to complete the configuration.
Q: How do I know if SSO is working?
A: Test by logging out and then logging back in with your corporate email. You should be redirected to your Okta login page and then seamlessly logged into Rhythms after authentication.